Most of you know why I created this design. It’s very simple: anyone who wears this on a garment breathes new life into the story of our freedom.
You are more than a wearer; you are a canvas. A canvas that ignites curiosity and calls for recognition. ‘Look! Those were the warriors of that time! That was their path, that was their fight!’
First, let’s go back to the basics:
Operation Market Garden:
- One of the largest operations of the Second World War.
- To liberate us from Nazi Germany.
- To cut off Nazi Germany via the western Netherlands and push through to capture the industrial heart of Germany. And to end the Second World War before Christmas 1944.
- Consisted of a large-scale airborne operation (codename “Market”) and a ground offensive from Belgium (codename “Garden”).
- From September 17 to September 25, 1944.
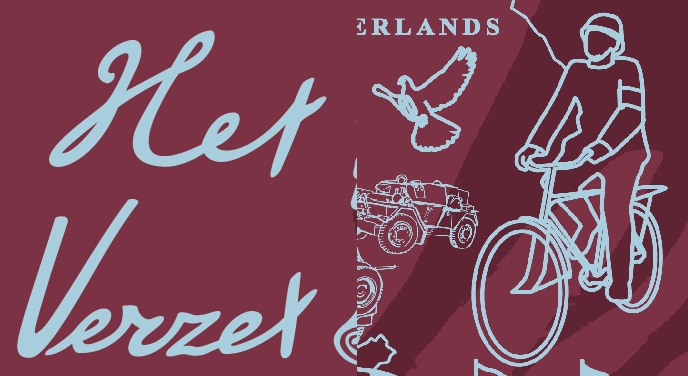
This is the front of the 2025 design:
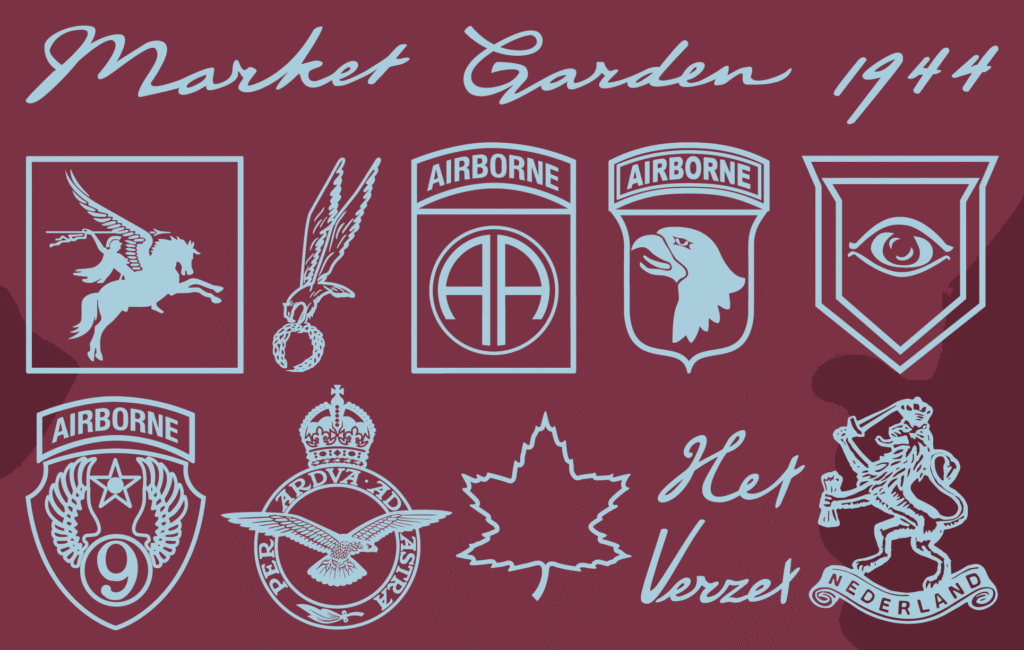
The texts ‘Market Garden 1944’, ‘Het Verzet’ (The Resistance), and ‘Lest we forget’ are based on the handwriting of that era: a combination of the Vere Foster Civil Service script and the Palmer Method of Business Writing. I deliberately gave the letter ‘G’ its own unique shape; in the original style, it closely resembled the capital letter ‘i’. This keeps the design authentic while ensuring optimal readability.
I often encountered this handwriting in letters home. By executing the titles and the message in this style, I want to convey the stories from the ‘field’—whether they took place in front of or behind the scenes—in a personal and meaningful way. In doing so, the hopes and deeds of our heroes, which are of invaluable importance to our freedom, become truly visible and heard once again.
Furthermore, several insignias are visible on the front of the garment, some more well-known than others. My idea behind this is to convey a personal message from the warriors themselves, so that we don’t just see their sacrifices, but truly acknowledge them.
Okay, back to the basics:
Operation Market Garden consisted of 2 parts:
Market; the airborne operation.
Garden; the ground offensive from Belgium.
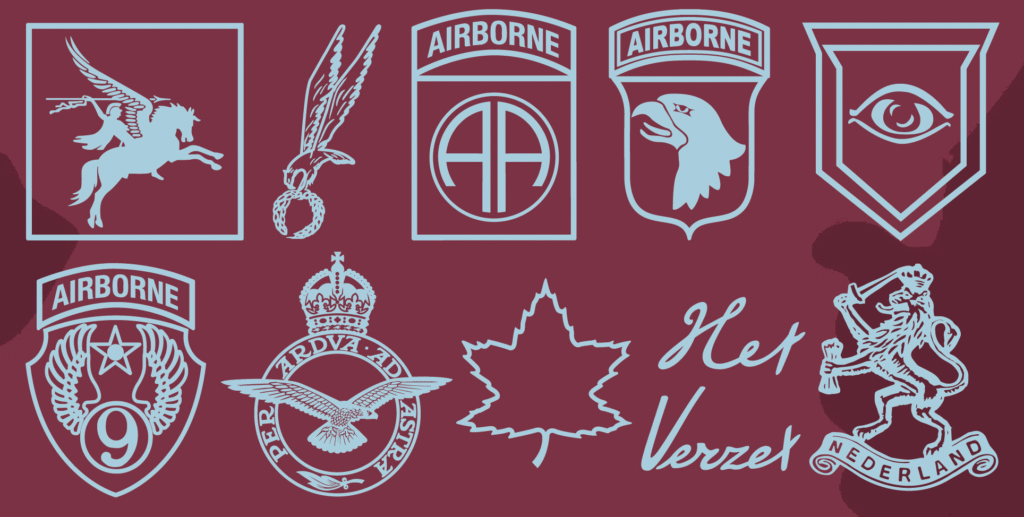
The featured divisions are listed below (from left to right):
- The British 1st Airborne Division (Pegasus logo). Market
- The 1st Polish Independent Parachute Brigade (Falcon). Market
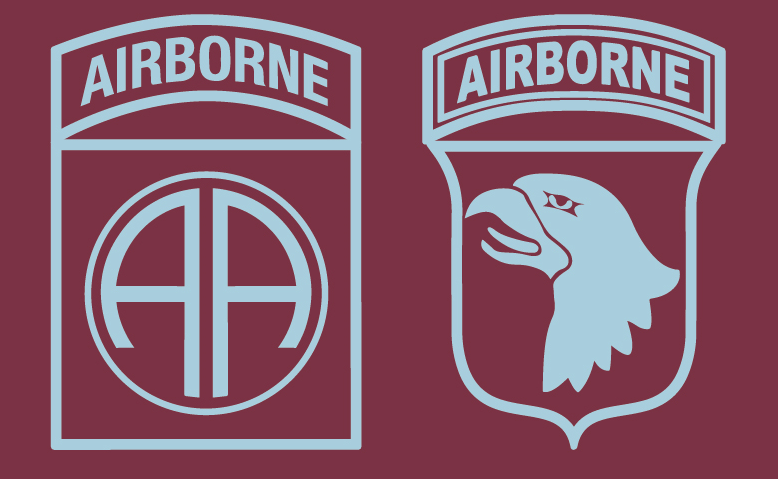
- The All-American (AA) 82nd Airborne Division. Market
- The 101st Airborne Division (Air Assault); “Screaming Eagles”. Market
- The British Guards Armoured Division (“Ever Open Eye”). Garden
- Ninth Air Force (9th AF) of the United States Army Air Forces (USAAF). Air support, transport, and supply: Market.
- The British Royal Air Force (RAF). Air support, transport, and supply: Market
- The Maple Leaf as the overarching symbol for the Canadian units. Market and Garden
- The Resistance. Market and Garden
- No. 2 Dutch Troop (Commandos) and the Princess Irene Brigade, grouped under the distinctive “Little Lion” insignia which they both wore on their uniforms. The Princess Irene Brigade was part of the ground offensive (Garden), while the commandos of No. 2 Dutch Troop joined the airborne landings (Market).
“I really wrestled with this one. The challenge was finding an image that carries the full weight of the story and hits people right in the heart. The canvas needs to pique curiosity and trigger a sense of recognition; only then is my mission accomplished. And boy, it was a lot of work! Just take a look at this:
Although I could have merged the insignias of the 82nd and 101st Airborne Divisions under the overarching emblem of the First Allied Airborne Army, I consciously chose not to.
While the latter would have made the design cleaner, the 82nd and 101st capture the imagination much more. People recognize these units instantly; there is often a strong personal interest or connection to them.
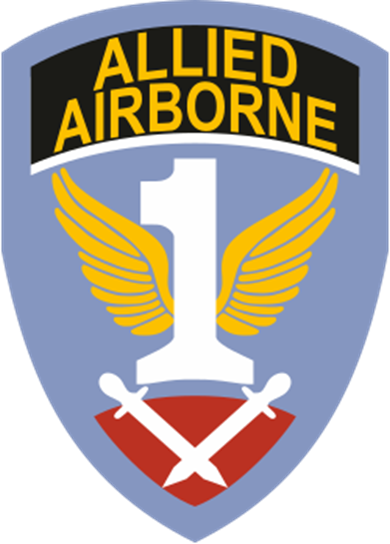
The First Allied Airborne Army
Source: https://en.wikipedia.org/wiki/First_Allied_Airborne_Army
The First Allied Airborne Army still lacks enough recognition among the general public. By specifically choosing the divisions, the warriors serving under them get the attention they truly deserve.
But anyway, that wasn’t even the biggest challenge.
What about Canada and the resistance?
Let me start with Canada first.
While the Americans and British fought with complete (and for me, distinct) divisions, the Canadians were spread across British units or active in supporting roles. The Canadians were involved in both the Airborne phase (Market) and the Ground Offensive (Garden).
You had the Canloan officers who were attached to the British 1st Airborne Division at Arnhem. The Royal Canadian Air Force (RCAF) also had a major presence, with 15 Canadian squadrons active in the air. They provided air and fighter support, carried out reconnaissance flights, and helped neutralize German anti-aircraft fire to clear the way for the transport planes. They did this using Spitfires and Typhoons, among others. The RCAF’s No. 83 Group was directly responsible for the air support of the ground troops of the 30th Corps (XXX Corps), which formed the backbone of the ‘Garden’ phase. A notable detail is the RCAF’s 437 ‘Husky’ Squadron, which was established just three days before the operation began.
Additionally, Canadian engineering units (Royal Canadian Engineers) made a crucial contribution, as did the logistics, transport, and flank support units. Canadian transport companies of the Royal Canadian Army Service Corps (RCASC) assisted with supplies along ‘Hell’s Highway’. Furthermore, there were specialized engineering units, such as the 20th and 23rd Field Companies of the Royal Canadian Engineers, which were part of XXX Corps.
They were truly everywhere. The Canadians were the invisible backbone of the operation. And indispensable during the rescue missions. Without that rescue operation (Operation Berlin), the tragedy at Arnhem would have been far greater. While the British 1st Airborne Division was surrounded and running out of ammunition, it was the Canadian engineers who crossed the Rhine in tiny storm boats in the pitch-black night. Under murderous German machine-gun fire, they kept rowing back and forth until every last man who could reach the bank had been brought to safety.
And just imagine: I haven’t even mentioned everything yet.
But how can you catch all those various roles within a single, clear logo or design?
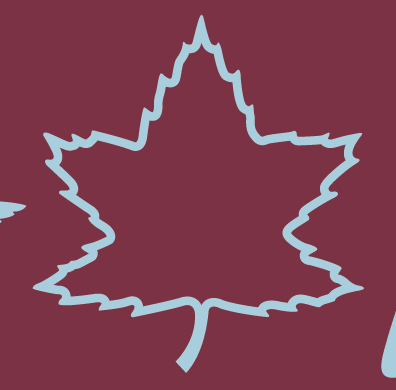
Well, I ultimately chose to use the maple leaf as the overarching symbol for the Canadian units. Not because of the Canadian flag; the current national flag of Canada, the well-known Maple Leaf Flag, was only officially adopted on February 15, 1965.
But during the Second World War, the maple leaf was painted on nearly all Canadian military vehicles as a specific vehicle marking (‘Vehicle Mark’ or ‘Unit Sign‘). The realistically serrated leaf was almost always placed on a square background. The color of that background provided more detail about the unit in question. But take note: not all markings featured a maple leaf. Some units were recognizable only by an abstract block of color in the shape of a square or rectangle.
But the maple leaf for the Canadians appeared in several other ways as well. It played a major role in road signage: the primary supply route for the Canadian Army through Western Europe was known as the ‘Maple Leaf Route.’ Along the roads, signs were posted with ‘Maple Leaf Up’ (towards the front) and ‘Maple Leaf Down’ (towards the rear). This route was primarily managed by the First Canadian Army, which consisted of the I Canadian Corps and the II Canadian Corps.
In addition, on Canadian war cemeteries in the Netherlands—such as those in Holten, Groesbeek, and Bergen op Zoom—the Maple Leaf plays a central role in the tribute. Many monuments at these sites, such as the ‘Maple Leaf Monument’ in Apeldoorn, use the leaf as a symbol of the Dutch people’s gratitude toward their liberators. The use of a maple leaf on the headstones immediately marks the grave as ‘Canadian soil’ in the hearts of visitors.
Today, everyone knows the maple leaf stands for Canada, partly due to the current iconic flag. But that isn’t the only reason I brought this flag back into the design on the back. Just flip the garment over…
On the back, you can see that I’ve made a conscious choice to include the current flags of all the allied nations involved.
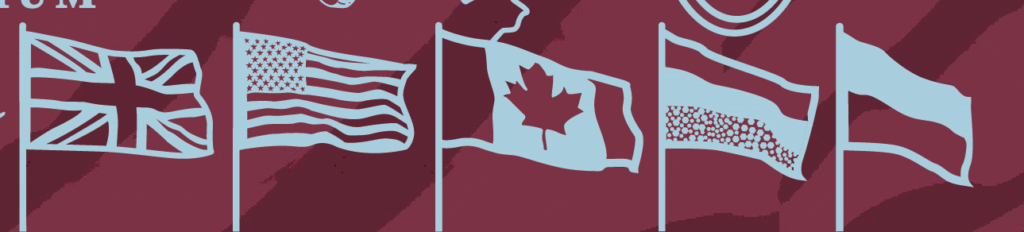
From left to right, you can see the current flags of the United Kingdom, the United States, Canada, the Netherlands, and Poland. While the historical American flag is still recognizable, the Canadian flag from that era looks completely different.
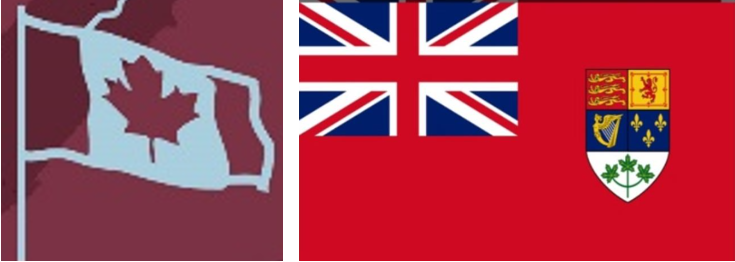
The old flag dates back to the colonial era and reminds us of an ethnocentric past. In contrast, the current flag symbolises cultural independence and Canada’s modern, inclusive society. Furthermore, at most monuments and commemorations today, the current flags are almost always used. It is a tribute to these countries as we know them now, out of respect for their current identity. If we were to use the American flag from that time, for instance, we would symbolically be excluding two states; states that also experienced the war. Granted, not during Operation Market Garden, but during the Second World War as a whole.
Here is the full view of the back; zooming out:

See that man on the bike over there?
Now, we’re moving on to the resistance:
Let’s take a look at the front and back again. This wasn’t something that was just done overnight. Not at all. But the result speaks for itself.

While the Allies advanced by air and land, the resistance provided support in various ways. Groups were active everywhere—sometimes identifiable by an armband, but often completely invisible to prevent reprisals against villages. After all, the consequences of discovery were inhumane for the entire community.
On September 5, 1944, the Landelijke Knokploegen (LKP – National Strike Groups) and the Raad van Verzet (RVV – Council of Resistance) were merged into the Nederlandse Binnenlandse Strijdkrachten (NBS – Netherlands Interior Forces) by royal decree (Bulletin of Acts and Decrees No. E62).
Although the official name was NBS, in practice the abbreviation BS was mostly used to avoid confusion with the National Socialist NSB.
Sometimes, members of other resistance groups were also assigned to the BS. For instance, on September 22, a part of Johan’s PAN—which was already working closely with the LKP—merged into the armed branch of the BS, the Stoottroepen (Shock Troops). The Ordedienst (OD) joined against its will. Group Albrecht, however, chose its own path; they remained underground for their vital intelligence work, even though key figures like Kees Brouwer (Eduard) and Cees van den Heuvel (Victor) were closely involved in the developments surrounding the BS.
The Allied command and the Dutch government in London harbored a great deal of mistrust, but that wasn’t the only reason for establishing the BS and placing it under the command of Prince Bernhard:
The government in London was genuinely afraid that the RVV (Council of Resistance), which had communist influences, would seize power as soon as the Germans were gone. The conservative OD (Order Service) did not trust the left-wing groups, while the fanatic ‘Knokploegen’ (Strike Groups) found the OD too passive. As a national figure, Prins Bernhard was acceptable to all camps and immediately gave the organisation international prestige among Allied generals like Eisenhower and Montgomery. Additionally, as a resistance fighter, being a member of the BS gave you the advantage of military status and recognition by an official force. This meant you were covered by the laws of war (Geneva Convention). If a BS member with an armband was captured, the Germans were supposed to treat him as a prisoner of war instead of being executed immediately as a ’terrorist’. This also meant that, as official soldiers, resistance fighters were not allowed to take the law into their own hands or lynch NSB members and collaborators. Because they were then subject to military discipline, they had to follow orders instead of acting as judge, jury, and executioner.
Because of all this, I couldn’t simply choose to use the BS armband as a universal uniform to represent the resistance as a whole. Especially not considering that famous, painful remark by the sceptical Montgomery: ‘I don’t think your resistance forces can be of any use to us.’
That is why I chose to represent the resistance by hand, in handwriting from that era. I also decided to depict a resistance fighter wearing a Dutch helmet (often the M27 or M34 model) with clothing and a blank armband that is as minimal in detail as possible. That way, everyone can interpret it for themselves
Take another look at the pigeon.
Did you know that during World War II, the pigeon was more than just a symbolic sign of peace? During Operation Market Garden in 1944, the resistance provided crucial aid and intelligence through the use of… pigeons!
Although the primary means of communication was via radio, it often proved far from reliable. That is why pigeons were deployed to transmit messages between units, especially when other means failed or were unavailable.
But how did they get those pigeons?
In 1942, in cities like Amsterdam, all homing pigeons had to be slaughtered. There was even a special ‘Pigeon Brigade’ to enforce this; even common city pigeons were caught because the Germans were terrified they would be used for espionage. Owners were even required to hand over the legs with the identification rings as proof that the birds had actually been killed. Yet, the occupiers never succeeded in making the cities completely ‘pigeon-free’.
The Allies dropped pigeons in baskets attached to parachutes in areas where intelligence was needed. Inside these baskets were specific questions: ‘Can you provide information or draw a diagram of a German position?’ The resistance fighter would place the note in a small tube attached to the pigeon’s leg and release the bird. As a token of gratitude, the sender would often later receive an official certificate.
One such pigeon ended up with resistance member Arnold Douwes after a farmer found the basket in his meadow. During a nerve-wracking search by the SS, Arnold, three people in hiding, and the pigeon were nearly discovered. Miraculously, the pigeon remained silent for all those hours, allowing them to finally release the bird once the Germans had left. This impressive story can be found today at the Onderduikersmuseum De Duikelaar in Nieuwlande. And on Facebook: Onderduikersmuseum de Duikelaar.
And don’t forget the pigeon ‘William van Oranje’. He was taken to the Netherlands by British paratroopers. While the paras were under withering fire, they released him. And he set a record: he covered the more than 400 kilometers between the Arnhem bridge and his loft in Cheshire, England, in just 4 hours and 25 minutes. For this act of heroism, he was awarded the Dickin Medal, the highest honor for animals.
Through their courage, these birds saved the lives of thousands of men!
Ok, I’m zooming out again to take another look at the big picture on the back:
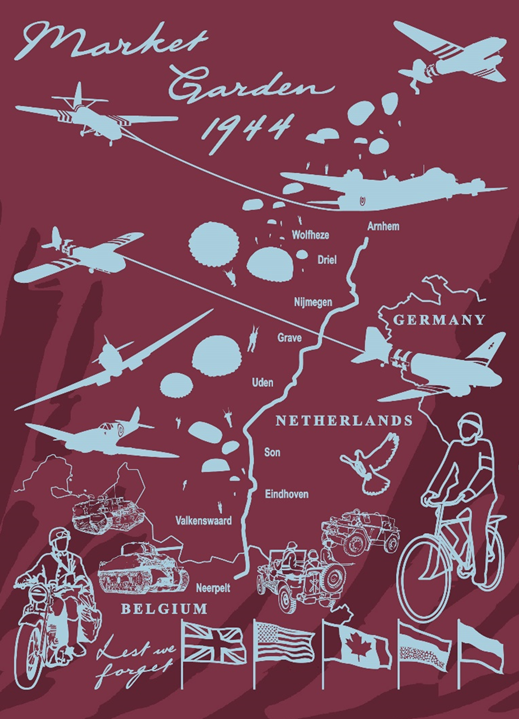
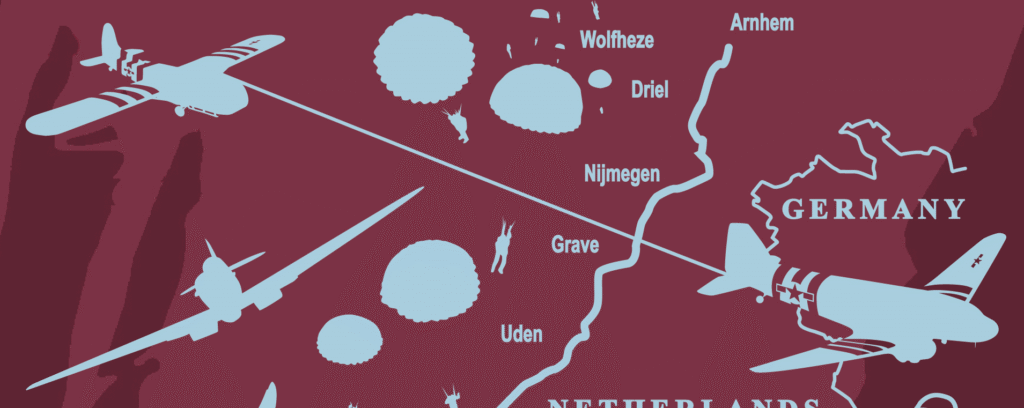
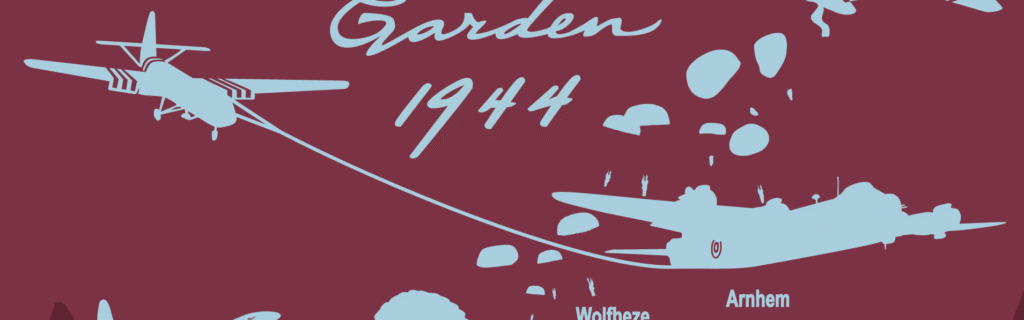
In this illustration you can see Belgium, from where Operation Garden was launched, alongside other points highlighting various chapters of the efforts during Operation Market Garden. Additionally, you can see how Operation Market descends from the sky to provide support.
Below is a brief overview of the paratrooper drop zones:
- Eindhoven (101st Airborne Division – “Screaming Eagles”)
- Nijmegen (82nd Airborne Division – “All American”)
- Arnhem (1st British Airborne Division)
- Driel (1st Polish Independent Parachute Brigade)
The route through Neerpelt, Valkenswaard, Eindhoven, Son, Uden, Grave, Nijmegen, Driel, Wolfheze, and Arnhem formed the backbone of the operation. The map also clearly illustrates how close Germany was to the entire operational area.
Let’s return to the era and the events preceding the operation first. After all, you’ll understand that the tanks and heavy machinery didn’t exactly fall out of the sky.
Let’s head back to Normandy.
The heavy equipment of the British XXX Corps (the ‘Garden’ component of Operation Market Garden)—such as the Sherman tanks that formed the backbone of the ground offensive—was brought ashore in Normandy in phases, starting on June 6, 1944 (D-Day) and in the weeks that followed.
The units of the XXX Corps (the 30th Army Corps) primarily landed on Gold Beach.
After the breakout from Normandy in late July (Operation Cobra), they advanced rapidly through France and Belgium. By the time Market Garden began on September 17, 1944, they were positioned at the Belgian-Dutch border near the Meuse-Escaut Canal.
While Joe’s Bridge — the famous jumping-off point for XXX Corps — is technically situated in the neighboring town of Lommel, the British forces actually assembled in the vicinity of Neerpelt.
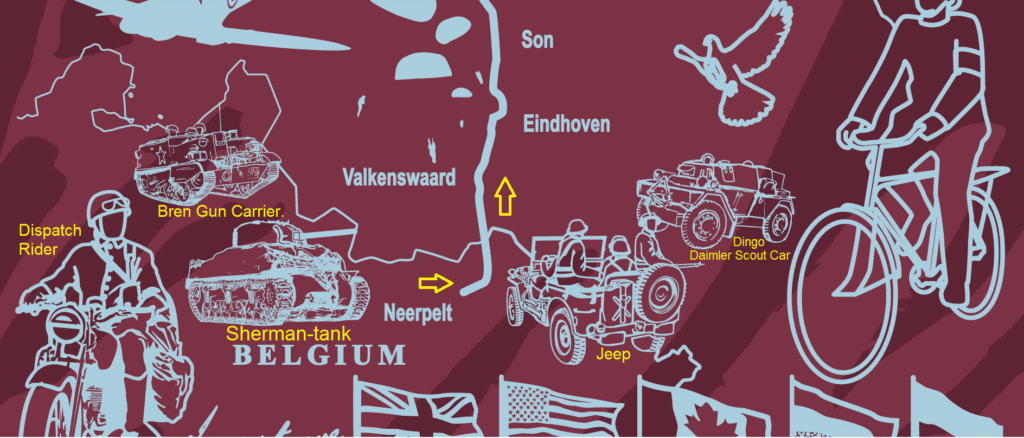
Neerpelt:
Neerpelt (Belgium) served as the jumping-off point for the spearhead of the ‘Garden’ operation. It was here, at the Meuse-Escaut Canal, that XXX Corps stood ready to launch the northward attack on September 17, at 2:35 PM.
Valkenswaard:
Valkenswaard was the first Dutch town to be liberated. It was the first major obstacle for the advancing British tanks. And it served as the first assembly point on Dutch soil.
Starting from Valkenswaard (often pronounced “Valkens-ward” by the British), it becomes clear why the entire corridor you see mapped out here was called ‘Hell’s Highway.’ Although, that name was only given later by American paratroopers of the 101st Airborne Division, who joined the route near Eindhoven.
The route was so narrow that if a single tank was hit, the entire XXX Corps column would grind to a halt for hours. There were repeated bloody battles and burning vehicles all along the route.
Amidst all this, the Princess Irene Brigade (PIB) crossed the Dutch border at Valkenswaard a few days later, on September 20, 1944. Together with the British XXX Corps (Garden), they took part in the advance toward Eindhoven, Grave, and Nijmegen. The Guards Armoured Division served as the armored spearhead of XXX Corps. That is why their logo is featured on the front to represent the ‘Garden‘ component—just as a striker in football represents their team.

The striker is often the one who receives the most attention because they are responsible for the goals. Since scoring is the most visible and decisive action, strikers are frequently seen as the ‘face’ of the team and tend to be the best-known players to the general public. So that is the reason behind this choice in the design.
Now, we’re moving further north. On this stretch, something else comes ‘dropping’ from the sky:
the American 101st Airborne Division (Market).
The American 101st Airborne Division (the ‘Screaming Eagles’) landed on September 17, 1944, at various locations between Eindhoven and Veghel:
- Northwest of Son.
- Near Sint-Oedenrode.
- Near Veghel.
- In the vicinity of Best.
By the way, Best is where the museum is located if you would still like to get a shirt or hoodie after having missed the pre-order. Museum HistoramaWereld. This there site: https://www.historamawereld.nl/
In this image you can see the American Waco glider, towed by a Douglas C-47 Skytrain acting as a ‘glider tug’.
Eindhoven:
The American 101st Airborne was tasked with linking up in Eindhoven with units of the British XXX Corps (Garden), specifically the armored units of the Guards Armoured Division, to keep the road to the bridges in the north open.
Son:
Infamous for the bridge over the Wilhelmina Canal. The Germans blew up the bridge right in front of the Americans, which caused significant delays in the operation. The British 9th Field Company, Royal Engineers, had to construct a Bailey bridge here.
Uden:
It was here, near Mariaheide, that the Germans cut through the corridor, causing the supply line to Nijmegen and Arnhem to be gridlocked for days.
Another Market part of the operation: The American 82nd Airborne Division (the ‘All-American’) landed on September 17, 1944, at various locations near Nijmegen, Groesbeek, and Grave:
- South of Groesbeek.
- Northeast of Groesbeek, near the Wylerbaan.
- North of Overasselt, between the Meuse and the Meuse-Waal Canal.
- West of the bridge at Grave.
Grave:
This was the site of the massive bridge over the Meuse. Thanks to a lightning strike by the 82nd Airborne, this bridge was captured intact, marking one of the few flawless successes of the operation.
Nijmegen:
The battle for the Waal Bridge. It took until September 20th to capture this critically important bridge, following a heroic crossing in small boats by the Americans.
Wolfheze:
Another Market part of the operation: the heart of the British landing zones. Here, the first gliders and paratroopers landed in the woods and on the heathlands, far from their actual objective in Arnhem.
The British 1st Airborne Division landed at various locations west of Arnhem during Operation Market Garden, primarily in the vicinity of Wolfheze, Heelsum, and Ede:
- Wolfheze & Heelsum.
- Ginkel Heath.
In this image you can see the British Airspeed Horsa glider being towed by a ‘glider tug.’ In this case, it’s a Short Stirling. I could have gone with a Douglas C-47 Dakota or a Halifax, but I already featured those in last year’s design. This time, it was the Short Stirling’s turn.
Arnhem:
The final objective, ‘A Bridge Too Far.’ Here, the British 1st Airborne fought a desperate battle to hold the Rhine Bridge against overwhelming German odds.
Driel:
Another Market part of the operation: the landing site of the Polish Brigade under Sosabowski. The 1st Polish Independent Parachute Brigade landed on the south bank of the Rhine to reinforce the British forces.
During the evacuation (Operation Berlin) on the night of September 25th, Polish troops at Driel provided essential cover from the south bank. Their goal was to help the surrounded British forces cross the river into liberated territory.
Right, that was the illustrated route.
Now, let’s take a look at some of the Dutch details.
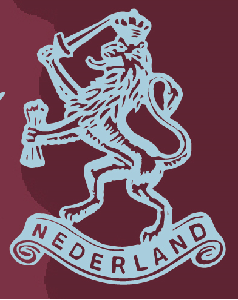
The Netherlands wasn’t just gratefully and hopefully embracing liberation—not even after the failed attempts. No, they didn’t just sit idly by. It wasn’t only the resistance that helped; No. 2 Dutch Troop (Commandos) and the Princess Irene Brigade played their part as well. On the front [of the design], I have brought these units together under the iconic ‘lion’ emblem that both wore on their uniforms. The Princess Irene Brigade was part of the ground offensive (Garden), while the commandos of No. 2 Dutch Troop (part of No. 10 Inter-Allied Commando) joined the airborne landings (Market).
The Dutch Commandos were distributed among the American and British paratroopers. Although officially attached as liaison officers or guides, they often fought on the front lines. Because they were fluent in the language, they were essential for the immediate interrogation of German prisoners of war and the translation of captured documents on the battlefield. Additionally, they provided on-the-spot instructions to resistance members and volunteers on how to use weapons, such as hand grenades, allowing them to join the fight immediately.
During Operation Market Garden, the Princess Irene Brigade also collaborated with the resistance in various ways, although the nature of this cooperation differed from that of the commandos with the airborne troops. While the commandos often worked alongside local guides at dropping zones, the collaboration within the Irene Brigade (as part of XXX Corps) primarily consisted of exchanging information and providing support during the advance through North Brabant.
Officers of the Princess Irene Brigade used intelligence from the Dutch resistance to warn Allied commanders. For instance, resistance groups reported the presence of strong German armored formations in the Arnhem/Nijmegen region—information that reached the military command through Dutch officers (though these warnings were often brushed aside by British leadership).
I also have another fun fact about our Dutch heroes: the 322 (Dutch) Squadron of the Royal Air Force, which flew Spitfires during World War II, was the first RAF squadron consisting entirely of Dutch personnel. The 322 (Dutch) Squadron was founded on June 12, 1943, in England, with the goal of training Dutch pilots and deploying them in the fight against Nazi Germany. They flew Supermarine Spitfires from June 1943 to October 1945. Their aircraft even featured an orange triangle.
During the war, Dutch airmen were stationed with the British Royal Air Force (RAF).
Several Dutch squadrons, such as 320 (Dutch) Squadron, carried out bombing missions around September 1944 in support of the Allied advance.
Of course, with every design, I’ll walk you through the details I’ve included. I’ll keep doing that, time and time again.
My hope? That those details eventually no longer spark questions, but pure recognition. Only then will my mission be complete: I want to bring the overlooked story out of the shadows of well-known history. It deserves a place in the spotlight, with just as much light on the stage as any other story. No one deserves to be forgotten—especially not after the sacrifices of the Second World War.
And remember: freedom is not just a memory of the past, but something today’s heroes work on every single day. You can find those heroes everywhere. Even among the younger generation, living in a time where we must remain mindful of what happened and the sacrifices that were made.
Lest we forget.